Tuesday, June 30, 2009

Not-Your-Momma's-Pasta Salad

pasta_salad

It gets hot in Florida. REALLY hot. And the last thing you want to even THINK about doing, is cooking a lot of hot food, then EATING a lot of hot food, in the hot hot summertime. It's enough to make you want to grab an ice cold mint julep and give up on the whole idea of food for awhile.

But fear not! There is salvation yet. Pasta Salad to the rescue!

Pasta Salad is incredibly easy, and if you buy a box of "Pasta Salad" to make it, you ought to be ashamed of yourself. Save your money and do it from scratch.

What will you need? Well, whatcha got? The basics of any pasta salad are - some kinda pasta, some kinda meat, some kinda cheese, and whatever you have leftover in your refrigerator. Mix with oil & vinegar & a few spices, stick it in the refrigerator for a bit, and it's done!

But for purposes of the blog, I'll tell you what I did to make THIS particular Pasta Salad.

Ingredients:
1 box of bow-tie pasta
about 1/4 - 1/2 cup canola oil
coupla tablespoons balsamic vinegar
garlic powder
4 oz cubed sharp cheddar cheese
4 oz cubed monteray jack cheese
a few tablespoons gorgonzola cheese
a few tablespoons shredded parmesean
1 can of kidney beans, rinsed and drained
1 small green pepper, diced
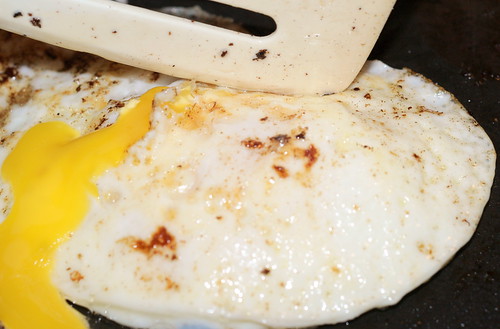
2 garlic-herbed chicken breasts, grilled in the pan & diced & cooled (about 2 - 3 cups)

Cook the bow-tie pasta according the directions, drain, and place into a large bowl. Before it starts to get sticky, pour in the oil & vinegar and toss well, coating each piece. Sprinkle liberally with the garlic powder, and toss again. Place in the refrigerator to cool it down for a few minutes, while you chop up the cheeses & pepper & chicken.

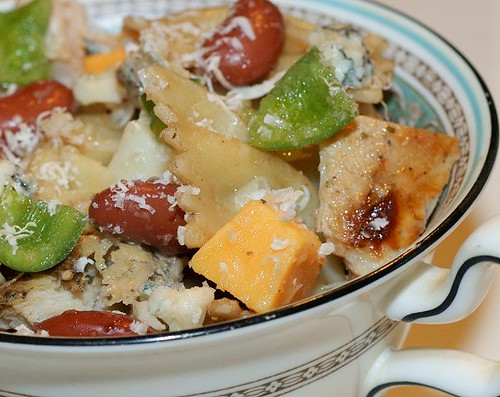
Take it back out again, and add the cheddar, monteray jack, and gorgonzola cheeses; add the chicken, kidney beans, and green pepper. Toss well! Finally, top with the shredded parmesean.

This will feed a crowd; it's a lot of food. It serves well as a main dish, and keeps well in the refrigerator.

Saturday, June 27, 2009

Firecracker Cookies

firecracker cookies

These innocent looking sandwich cookies come with an explosive surprise - Pop Rocks hidden in the center!

I used to make these for my daughter when she was little for the Fourth of July. I'm betting once she sees this post, she'll be willing to take them off my hands again!

Here's the recipe:

2 cups all purpose flour
1 1/2 tsp baking powder
1/4 tsp salt
3/4 cup sugar
2/3 cup shortening (I use butter)
1 egg
1 Tbsp milk
1 1/2 tsp vanilla
food coloring
Pop Rocks, and/or crushed Red Hots/ Atomic Fireballs
Twizzlers for the fuses

In a bowl combine flour, powder, and salt.

In your mixer bowl, beat the sugar and shortening until it's fluffy. Add the egg, milk & vanilla and beat well. Add the flour mixture, beating until well combined. Add the red food coloring.

Stick it in the refrigerator and chill for an hour or so.

Roll the cookie dough fairly thin on confectioner's sugar, NOT flour. It's a sandwich cookie so you don't want it too thick. A little thicker than a pie crust is about right.

cookie cutterCut out your cookies, place on a cookie sheet that's been sprayed with PAM. Bake in a 325 degree oven for 6 - 10 minutes, or, just as they start to brown around the edges. They bake quick! So keep an eye on them.

Cool on wire racks. Store in airtight containers until you're ready to put them together. They don't really last well, once you add the Pop Rocks; the Pop Rocks will pick up the moisture after a bit and get soggy.

I'd like to give you a recipe for the frosting, but really all I do is just beat a softened stick of butter with a box of confectioner's sugar, a tablespoon or two of milk, and a wee bit of vanilla. Beat it until it's the consistency that you want.


Outline the cookies with frosting, and sprinkle the candies in the center. Don't overfill, or the top cookie won't stick. Put another cookie on top, smoosh down a little, and then turn it on it's side and "caulk in" more frosting to help seal it.

Decorate the tops with more frosting however you like, plate them. I'd suggest not telling folks about the Pop Rocks; let it be a surprise!

Friday, June 26, 2009

Vegetable Pizza

veggiepizza

Nursing is a hard job, with small rewards, but one of those rewards comes around the holidays, when everyone and their visitors brings us goodies. Cakes, cookies, candies galore abound at the nurses' station for oh, a week or two before Christmas.

It's wonderful, and gratifying, but it gets to the point when there's sugar overload, and you just can't look another brownie in the eye.

Such was the case one year, when one of our visitors brought in this lovely gem of a food: Veggie Pizza! It was such a lovely, welcomed change of pace. It didn't take much prodding for me to get the recipe. Of course, it's all over the place now - and with good reason. It's fabulous; yummy; looks great; and it's EASY.

Need to bring something to an office party? Bring this, and they'll be begging for you to bring it everytime. I know. I get asked to make it time and time again.

Here's the ingredients:

2 - canisters of Crescent Rolls (they make a "recipe creations" variety now that works great)
2 - 8 oz boxes of cream cheese, room temperature
1 small bag of raw pre-washed broccoli and cauliflower mix
2 Roma tomatoes
Shredded Cheddar cheese

Spray the cookie sheet with PAM, unroll the crescent rolls out of the canisters and fit them onto the sheet to form the pizza dough. If you want, you can sprinkle the edges with herbs and/or garlic powder. Bake it in the oven according to the directions - except, the "recipe creations" says to bake it almost 20 minutes; they lied. Ten minutes would be more like it. You want it brown and done, but not burnt.

veggiecheese

Bring it out of the oven, and spread the cream cheese over the dough. Then it's just a matter of adding the toppings!
veggies

Cut the broccoli and cauliflower into smaller pieces, spread them throughout the pizza. Chop up the tomatoes, seed, and add those. Top with shredded cheese. Cut into slices. Try to keep yourself from eating it all before the party. MMM! Good stuff. And relatively healthy for you, too!

veggiepizza3
Align Center

Wednesday, June 24, 2009

Fried Okra

fried okra

My Great-Aunt Alice, who was really my first cousin twice removed, once lamented to me that "young people just don't know how to do the BASICS of cooking anymore. I had a young lady ask me how to snap beans, once!"

I sympathized, but I couldn't say anything. I sure knew how to snap beans - I think my grandmother taught me how to do that on her front porch when I was three years old - but at one point I didn't know a whole lot about cooking, either. My mom used to run us out of the kitchen!

So when I can, I'll include "basics of cooking" - such as, fried okra. It's one of those things that's really easy to do, but unless you've ever been shown it - you just don't know how to do. So I'm going to show you.

First of all - don't get the biggest okra you can find. As okra gets bigger, it generally gets tougher and bitter, and no one will want to eat it. The only caveat to this is - there ARE some varieties that are short and squat that are really sweet and good, but unless you grew them yourself or got them from someone who grew them themselves, you're not likely to run into them. So - buy some okra that is relatively small, like these. They're about - oh, I dunno, 4 or 5 inches -

raw okra


Rinse them well, then trim off the heads and the tails; discard those.

About this time you'll need to get your oil ready; I just use a large frying pan with about 1/2 inch of oil. I use canola oil. You'll want the oil hot, so I set the burner between med. high and high. When it starts to pop, it's ready.

Cut the okra up into about 1/4 inch to 1/2 inch pieces. If it's a large piece of okra, cut them thinner. As you're cutting, throw them into a bowl of corn meal and coat well. The insides will be gooey like snot.

bread the okra

Now the fun part - fry those suckers up! Shake off the excess corn meal, and add them to the oil - few pieces at a time. Add them fast, but don't get burned!

panfry

Turn them as they start to brown. It shouldn't take more than 5 - 10 minutes, each side. When they're brown, take them out and put them on paper towels to drain.

okra

This is when you add salt to them. Doesn't have to be much, just enough to enhance the flavor. You can now stick them in a warm oven while you finish cooking the rest of your dinner - but be sure to pop a few in your mouth, too! All good cooks have to taste test.

Fried okra, if done right and done with the right sized okra, is almost sweet. Serve it with your favorite meat & side dish. Tonight we had it with panfried pork chops and mashed potatoes.

dinner

Monday, June 22, 2009

Pan-fried Summer Squash

squash
Nobody in my family likes summer squash, but me. I don't care. I'll cook it till the day I die.

Especially when it's cooked like how my mom used to make it, pan fried in butter, with lots of vidalia onions and topped with parmesean cheese. I don't care WHO you are, that's some good eatin.

onionsFirst - slice up a vidalia onion - or, if you are unlucky enough not to have vidalia onions where you are - any sweet onion will do. Start panfrying it up with a healthy dab of butter, with the burner set between medium - medium high.

While that's starting to cook, peel your squash. If it's really small, you can omit this step, but as they get larger the peel starts to turn bitter. Chop them up and add them to the onions.

parmeseanWhen they start to wilt a little bit, you can turn it down to medium and cover it with a lid. Continue to stir every few minutes, until it starts to brown and caramelize a bit.


When the onions and squash are good and wilted and have a nice, gooey texture to them, add a couple of tablespoons of grated parmesean cheese and salt and pepper to taste. Let the parmesean melt for a minute or two over the fire, then plate it.

MMMMmmmm. Good eat'n.

squashplate

Friday, June 19, 2009

Grits, Bacon & Eggs

grits bacon and eggs

When my baby sister and I were little, we used to get carted off to my grandmother's house, every other Friday night, to spend the night. "But I don't WANT to go, ma! She cuts our nails way down to the QUICK and makes us pull weeds for a NICKLE!" "She's a lonely old woman. Grab your teddy bear and get into the station wagon!"

To be fair, she would pay us a quarter for pulling weeds, when we got older.

She lived in a great big old haunted Victorian house in the historic district of town, which used to scare the bejeeebus out of us when things would go crik in the night. And since she was an early riser, we'd wake up sometimes and she wouldn't be there - she'd already be in the kitchen, drinking her coffee and reading her paper.

For breakfast, she'd usually cook us Grits, Bacon and Eggs.

Now, little critters like ourselves - we used to eat the bacon and eggs without any problems, but grits, even for us true-blooded southern gals, was a bit of a stuggle to get down us. Something about the texture, I think. So what she would do would be to cook it all up and then mash it all together, so we'd end up eating some grits just to get to the good crunchy bacon parts.

I hated it, then, as a kid; now, it's my most tried and true comfort food, hands down, evar.

This recipe will feed two if you're a Yankee, one if you're a Southerner.

First, you have to cook the individual parts. I always start with the grits. I use yellow grits, but if you like your corn grits to have bleach in them, go ahead and get the white grits. Up to you, personally I prefer to have a little bit more color to my food.

Grits are easy enough to cook, and why some people buy instant grits is one of the great mysteries of the universe. Grits cook fast, and if anyone tells you different they're lying to you.

grits1

The way you're SUPPOSED to cook grits, is to put a cup of water to boil on the stove, add some salt and butter to it, and when it's boiling - add 1/4 cup of grits to it, and stir until it's done. But that's aggrevating because once you used your measuring cup to measure the water, and then you add grits to it, the grits stick to the cup and make a mess. So this is how *I* do it: I measure the grits, first, add it to the pot, add the cup of water (which rinses out the grits!), add salt & butter, stir it all up, and bring to a boil. How fast you bring it to a boil, depends upon how long it takes you to cook the rest of the goodies. After you bring it to a boil, though, stir it and stir it until it starts to thicken up - and then take it off the fire and let it sit for a few minutes. It'll continue to thicken up.

While you have your grits going, cook up some bacon. How many pieces? well that depends on your appetite. At least two!

There's lots of ways of cooking bacon. You can cover it in paper towels and cook it in the microwave for five minutes or so. You can lay them on a cookie sheet and bake it in a 400 degree oven for 15 minutes. Or, you can do it the CORRECT way and risk life, limb, and 3rd degree burns by cooking them in a frying pan. Believe me, it's well worth the effort.

bacon1

After you've cooked up the bacon, lay them on paper towels to drain, and pour most of the bacon grease into a heat-proof container for later use. No use in wasting the bacony goodness!

bacon grease

Next - time to make the eggs. How do you like your eggs? You can scramble them of course, which would be the easiest way to do it, but I like mine fried, with the yolks still runny. "Over easy" is I guess how it's called. Fry them until they are well and set, then turn them over.

eggs

If the yolks break, that's ok. Nobody's perfect and it all goes to the same place anyway. How you check to make sure the whites are done, is to "tap" it using the edge of the spatula, on the white, right next to the yolk. If it feels firm, and the yolk is still wiggly, it's ready.

fried egg

Now comes the fun part! Putting it all together!

Plate the grits.

plate the grits

I prefer the plates that are almost bowls, but if your grits are the right consistency it won't matter much. Add butter to the grits, and mix it up well. Layer with the fried eggs, then the bacon - and with your fork, mix it all up.

Viola! Grits, bacon and eggs.

grits bacon and eggs

For variation, you can cook up patty sausage instead of bacon. And never eat it on Fridays, or you'll have to do an extra decade of the rosary. Like I'll have to do.