Nursing is a hard job, with small rewards, but one of those rewards comes around the holidays, when everyone and their visitors brings us goodies. Cakes, cookies, candies galore abound at the nurses' station for oh, a week or two before Christmas.
It's wonderful, and gratifying, but it gets to the point when there's sugar overload, and you just can't look another brownie in the eye.
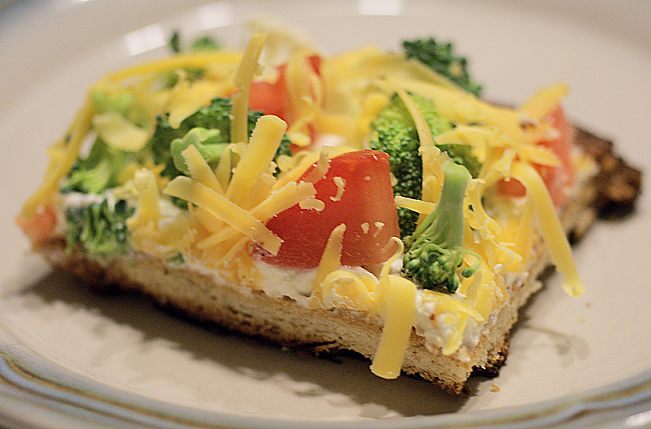
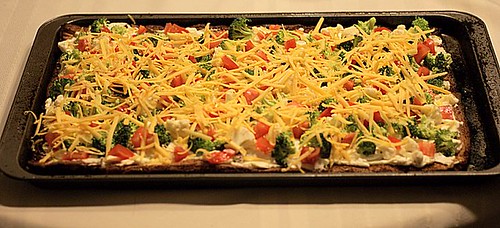
Such was the case one year, when one of our visitors brought in this lovely gem of a food: Veggie Pizza! It was such a lovely, welcomed change of pace. It didn't take much prodding for me to get the recipe. Of course, it's all over the place now - and with good reason. It's fabulous; yummy; looks great; and it's EASY.
Need to bring something to an office party? Bring this, and they'll be begging for you to bring it everytime. I know. I get asked to make it time and time again.
Here's the ingredients:
2 - canisters of Crescent Rolls (they make a "recipe creations" variety now that works great)
2 - 8 oz boxes of cream cheese, room temperature
1 small bag of raw pre-washed broccoli and cauliflower mix
2 Roma tomatoes
Shredded Cheddar cheese
Spray the cookie sheet with PAM, unroll the crescent rolls out of the canisters and fit them onto the sheet to form the pizza dough. If you want, you can sprinkle the edges with herbs and/or garlic powder. Bake it in the oven according to the directions - except, the "recipe creations" says to bake it almost 20 minutes; they lied. Ten minutes would be more like it. You want it brown and done, but not burnt.
Bring it out of the oven, and spread the cream cheese over the dough. Then it's just a matter of adding the toppings!

Cut the broccoli and cauliflower into smaller pieces, spread them throughout the pizza. Chop up the tomatoes, seed, and add those. Top with shredded cheese. Cut into slices. Try to keep yourself from eating it all before the party. MMM! Good stuff. And relatively healthy for you, too!
It's wonderful, and gratifying, but it gets to the point when there's sugar overload, and you just can't look another brownie in the eye.
Such was the case one year, when one of our visitors brought in this lovely gem of a food: Veggie Pizza! It was such a lovely, welcomed change of pace. It didn't take much prodding for me to get the recipe. Of course, it's all over the place now - and with good reason. It's fabulous; yummy; looks great; and it's EASY.
Need to bring something to an office party? Bring this, and they'll be begging for you to bring it everytime. I know. I get asked to make it time and time again.
Here's the ingredients:
2 - canisters of Crescent Rolls (they make a "recipe creations" variety now that works great)
2 - 8 oz boxes of cream cheese, room temperature
1 small bag of raw pre-washed broccoli and cauliflower mix
2 Roma tomatoes
Shredded Cheddar cheese
Spray the cookie sheet with PAM, unroll the crescent rolls out of the canisters and fit them onto the sheet to form the pizza dough. If you want, you can sprinkle the edges with herbs and/or garlic powder. Bake it in the oven according to the directions - except, the "recipe creations" says to bake it almost 20 minutes; they lied. Ten minutes would be more like it. You want it brown and done, but not burnt.
Bring it out of the oven, and spread the cream cheese over the dough. Then it's just a matter of adding the toppings!
Cut the broccoli and cauliflower into smaller pieces, spread them throughout the pizza. Chop up the tomatoes, seed, and add those. Top with shredded cheese. Cut into slices. Try to keep yourself from eating it all before the party. MMM! Good stuff. And relatively healthy for you, too!